
Hairline Stucco Cracks: What Each Pattern Is Telling You
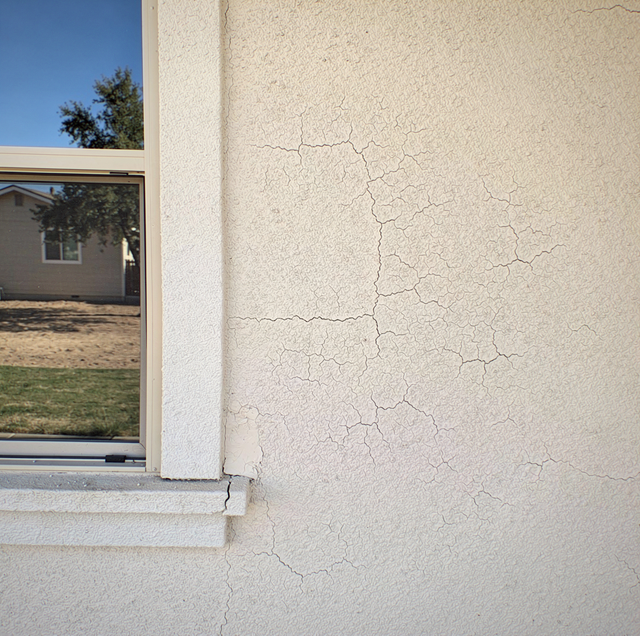
Quick Answer: Most hairline stucco cracking is finish-coat shrinkage, not a structural problem. Escalate a long horizontal crack, a stair-step crack over block, or any crack beside a stain, bulge, or soft spot.
Every stucco wall cracks. That's simply what a rigid, cementitious skin does over a wood-framed structure that shrinks as it dries, moves with the seasons, and settles by fractions over years. Cracking inside a house follows the framing behind a single painted panel, but a stucco crack forms in a hard, weather-facing skin built in layers over that same framing, so what it may be letting in behind the finish matters as much as what caused it. The real question isn't whether a wall has cracks. It's which of a handful of recognizable patterns a given crack belongs to, and what that pattern says about the wall underneath.
A drying stretch of clay left out in the sun tells the same story. As water leaves the surface, the top layer shrinks faster than the material beneath it, and the surface opens somewhere to relieve that stress, splitting into a mosaic of small plates. A troweled stucco finish cures by the same logic, and most of what shows up on a stucco wall sorts into a handful of recognizable patterns.
Crack Pattern Quick Reference
| Crack pattern | Likely mechanism | Worth a professional look? |
|---|---|---|
| Fine map cracking or crazing | Finish-coat shrinkage during cure | Usually not |
| Diagonal crack off a corner | Stress concentration at an opening | Only if it keeps growing |
| Follows a stud line or lath seam | Telegraphing from framing or lath | Usually not |
| Horizontal crack at a floor line or joint | Missing or misplaced control joint | Yes |
| Stair-step crack on masonry | Movement in the substrate beneath | Yes |
| Crack with a stain, bulge, or soft spot | Possible water behind the finish | Yes, promptly |
Fine Map Cracking and Crazing across a Field
What it looks like: A web of fine, wandering lines across an open field of wall, not aimed at any corner or opening, closer to a dry lakebed than to one deliberate crack.
The mechanism: A stucco finish coat, whether part of a traditional three-coat system (scratch coat keyed into the lath, brown coat for body, then a thin colored finish coat) or a one-coat system combining base and finish into fewer passes, cures by losing water. When the finish dries faster than the coat beneath it can accommodate, because the wall took direct sun during application, was troweled thin and hard, or wind pulled moisture from the surface too quickly, the skin shrinks in place and relieves that stress in a fine, even network instead of one long line.
On its own, crazing is a condition in the outer coat, common enough on properly built jobs during the curing period that its presence alone rarely means more than ordinary cure shrinkage.
What's Actually Behind the Finish Coat
Stucco isn't one material troweled onto a wall; it's a layered system, and every pattern in this article shows up in the outermost layer of that system, whatever caused it underneath. A traditional application consists of three coats: a scratch coat keyed into the lath, a brown coat that builds the wall's body and levels it, and a thin, colored finish coat that carries the texture everyone sees. A one-coat system compresses the base coats into fewer passes but still finishes the same way on top. Underneath all of it is the lath itself, expanded metal or woven wire, fastened to the framing with corrosion-resistant nails or staples and lapped sheet to sheet.
Behind the lath, separating it from the wood sheathing, sits a weather-resistive barrier, the paper or synthetic wrap that is the wall's real water-shedding layer; the finish coat on top is decorative, not waterproof. Control and expansion joints are set into large fields of stucco on purpose, giving the wall planned places to move instead of one unplanned crack, and a weep screed, a formed metal strip at the base of the wall, terminates the assembly so any water reaching the barrier has a way back out instead of collecting against the framing. None of that layering sits behind a painted interior wall, which is why a stucco crack raises a question drywall never does: not just why it opened, but what it might be letting in behind the finish.
Cracks at Corners and Masonry Joints
A crack starting at the sharp corner of a window or door and running diagonally away from it is a stress-concentration crack: every opening cut into a wall gathers movement at its corners first, and without diagonal reinforcing mesh set into the coats before they cured, that stress has nowhere else to go. Alone, it's typically stress relief rather than a moving foundation, though it's worth watching for growth.
A crack that moves in a jagged, stepped line instead, tracing the mortar joints of a block wall beneath the stucco, is different: it follows the weakest plane in the masonry beneath it, not moving through the coating on its own. Minor differential settlement or ordinary expansion and contraction of the block opens those joints first, and the finish over the top simply reflects the line straight through. Because it traces movement in the substrate rather than the finish coat, a stair-step crack deserves a closer look than either a corner crack or fine crazing.
Cracks That Follow a Stud Line or a Lath Seam
What it looks like: A straight, often faint crack at a regular interval that lines up with stud spacing behind the wall, or a long, unbroken line that doesn't correspond to any opening.
The mechanism: This is a telegraphing crack. The metal lath stucco is fastened to sit over a weather-resistive barrier and attaches to the framing with nails or staples, with sheets lapped and joined edge to edge. If a seam between two sheets isn't lapped enough, or the framing behind it dries and shrinks unevenly as a new house settles in, that seam or stud line shows through the coats above it as a crack tracing the framing rather than any pattern the finish coat produces on its own.
A telegraphed crack is usually cosmetic, but it earns its own category because it's easy to mistake for something more serious. It follows a repeating grid because it's tracing something behind the stucco, not because the stucco itself failed.
Horizontal Cracks at a Floor Line or a Control Joint
The pattern that deserves the most attention: A horizontal crack running long and mostly straight, particularly at a floor line, at a single-story-to-two-story transition, or anywhere a control or expansion joint should sit but doesn't.
The mechanism: A large, unbroken field of stucco needs control joints, built-in weak points that let each section move independently. A wall built without enough of them, or missing one at a framing transition where movement is greatest, has no planned place to relieve that stress, so it finds its own, usually a long horizontal line at the weakest plane. At the base of the wall, the casing bead and weep screed terminate the stucco and allow any water that reaches behind the finish to drain back out, which is why a crack near that transition deserves extra attention.
Unlike crazing or a corner crack, a long horizontal run more often reflects the wall's joint layout than cure shrinkage, and it's the pattern most likely to widen with the seasons.
A Crack Paired with a Stain, a Bulge, or a Soft Spot
What it looks like: Any of the patterns above, but next to a rust-colored or dark stain, or a section of wall that bulges or feels different than the surrounding surface.
A crack alone is usually the coating relieving stress. One beside a stain or soft area is different: it suggests water has gotten behind the finish and is affecting what's underneath, not just the surface skin.
This combination is the one pattern here worth acting on rather than watching through another season, since it can mean water is already reaching the sheathing or framing behind it.
What You Can Actually See from the Ground
A few checks can be done from the ground, without a ladder:
Hold a business card to the edge of a crack to judge width: one finer than the card's edge is a hairline crack, while one wide enough to catch a fingernail run across it is worth photographing and tracking.
- Edge condition: Sharp, clean edges suggest recent movement. Edges that are rounded, dirty, or weathered like the surrounding finish have likely been stable for a while.
- Change since last year: A photo from a season or two back, compared against the wall today, tells you more than a single look ever will.
- Nearby staining: A rust or brown streak trailing down from a crack, especially below a window sill or a roof-to-wall intersection, is the clearest ground-level sign that water is moving through rather than the coating simply flexing.
What Repair Actually Involves
Not every crack calls for the same fix, and that difference matters more than the crack's width alone.
A cosmetic elastomeric patch bridges a stable, cosmetic crack with a flexible coating that moves with minor seasonal shifts without reopening. It suits map crazing and a single corner crack that hasn't grown, on a wall with no other symptoms nearby.
A cut-out and re-coat removes the cracked section back to sound material and rebuilds the coats properly, including reinforcing mesh at any corner or joint that was missing it the first time. This suits telegraphed lath-seam cracking or a horizontal crack tied to a missing control joint, where a surface patch would just crack again along the same line.
Opening the wall provides the scope for anything paired with a stain, a bulge, or a soft material, so the lath, barrier, and framing behind it can be inspected and corrected instead of recoating over the top.
Cutting, grinding, or chipping into cured stucco releases fine silica dust, a respiratory hazard that requires containment and respiratory protection. That step belongs to a licensed crew with the right equipment.
Frequently Asked Questions
Not usually on its own. A hairline crack mostly lets water reach the brown coat, which absorbs it and dries back out. Over wood sheathing, stucco is typically installed over two barrier layers, so the inner one stays protected even when the outer one gets wet. Trouble starts when water finds a gap in those layers at a window, penetration, or roof-to-wall intersection.
Conditions at each corner during the cure are rarely identical. The side that took afternoon sun or wind while the coats were curing dried faster and shrank harder, and a window frame that has settled slightly out of level loads one corner more than the other. Missing diagonal mesh at just one corner can compound either.
Yes, with a sound test: tapping the wall with a knuckle or a screwdriver handle and listening for the difference between a solid thud and a hollow, drum-like sound. A hollow area usually means the coats have separated from the lath or from each other, even where no crack is visible yet.
Yes. Any pipe, vent, or fixture penetrating the stucco disrupts the lath and base coats around it, creating a miniature stress point with no formal control joint. It follows the same logic as a cracked corner, just triggered by a hole instead of a window.
It can. Stucco lath should be attached with corrosion-resistant fasteners, typically galvanized or stainless steel nails or staples. Ordinary fasteners can rust and swell slightly inside the wall, a process called rust-jacking, which shows up as small, raised cracks that resemble telegraphing stud-line cracking but are driven by corrosion instead.
Not entirely. Traditional stucco is a hard, cement-based coating with no give under a fingertip near a crack, whereas EIFS is built over a foam insulation board, so the wall flexes slightly when pressed near a crack. Because EIFS covers foam rather than lath and framing, a crack in it points to a different location and is worth flagging before assuming the same fix applies.
Request a stucco crack assessment before assuming a patch will hold — a trained eye on the wall can tell you which pattern you're actually looking at. Clover Valley Home Service serves Greater Sacramento, Placer, and El Dorado counties. CSLB #1003154. Call (916) 742-3141.
